> ## Documentation Index
> Fetch the complete documentation index at: https://docs.gorbit.cloud/llms.txt
> Use this file to discover all available pages before exploring further.
# Digital Ocean
> نشر Gorbit على Digital Ocean Droplets
أنشئ Droplet بالموارد المناسبة. لهذا الدليل،
سنستخدم تكوينًا موصى به مع Docker مثبت مسبقًا.
اقرأ [دليل الموارد](/deployment/getting_started/resourcing) لمزيد من التفاصيل.
* أعطِ Droplet اسمًا وصفياً مثل `gorbit-prod`
* اختر منطقة قريبة من مستخدميك
* اختر صورة `Docker` من تبويب *Marketplace*
* اختر حجم Droplet بـ 4 vCPUs على الأقل و 16 جيجابايت RAM
* قم بتكوين التخزين وفقًا لدليل الموارد
* أضف مفتاح SSH للوصول الآمن
انقر **Create Droplet** ثم اعرض تفاصيل Droplet.
احفظ **Public IP address** للـ Droplet!
 If you don't have a domain, buy one from a DNS provider like [GoDaddy](https://www.godaddy.com/)
or just skip HTTPS for now.
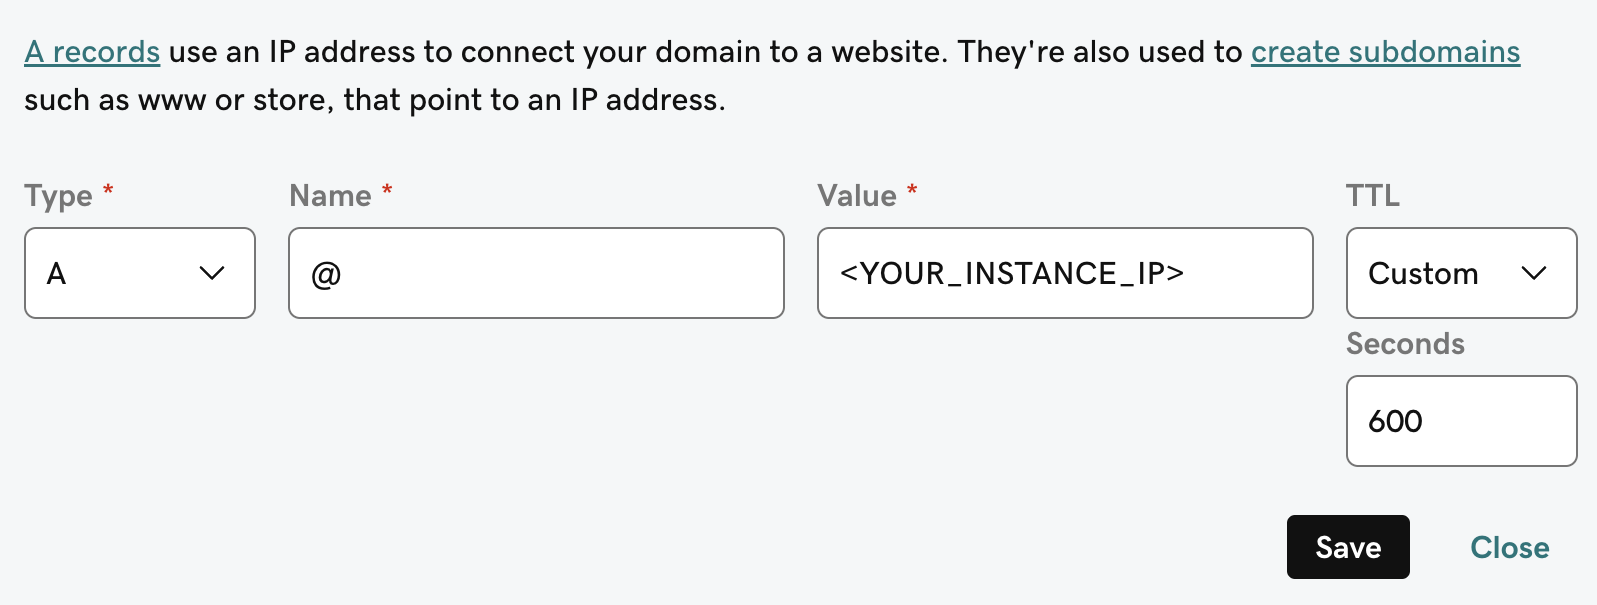
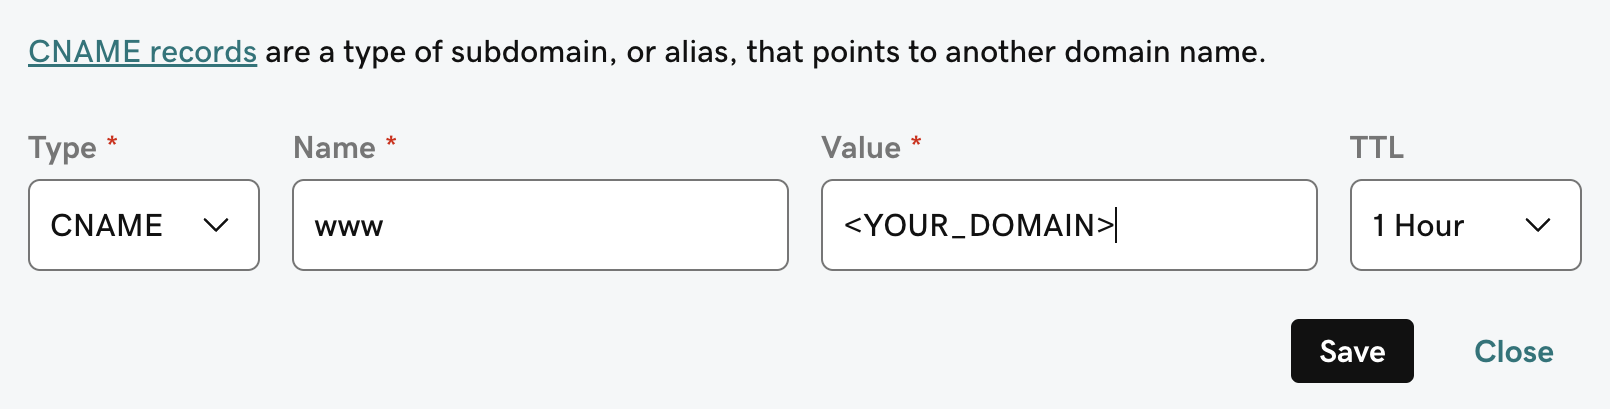
To point our domain to the new instance, we need to add an `A` and `CNAME` record to our DNS provider.
The `A` record should be the subdomain that you would like to use for the Gorbit instance like `prod`.
The `CNAME` record should be the same name with the `www.` in front resulting in `www.prod` pointing to the full
domain like `prod.gorbit.app`.
If you don't have a domain, buy one from a DNS provider like [GoDaddy](https://www.godaddy.com/)
or just skip HTTPS for now.
To point our domain to the new instance, we need to add an `A` and `CNAME` record to our DNS provider.
The `A` record should be the subdomain that you would like to use for the Gorbit instance like `prod`.
The `CNAME` record should be the same name with the `www.` in front resulting in `www.prod` pointing to the full
domain like `prod.gorbit.app`.
 بما أننا اخترنا صورة Docker Marketplace، فإن Docker و Docker Compose مثبتان بالفعل.
نحتاج فقط لتثبيت `git`:
```bash theme={null}
sudo apt update
sudo apt install -y git
```
## Next Steps
Set up authentication for your Gorbit deployment with OAuth, OIDC, or SAML.
Learn about all available configuration options for your Gorbit deployment.
بما أننا اخترنا صورة Docker Marketplace، فإن Docker و Docker Compose مثبتان بالفعل.
نحتاج فقط لتثبيت `git`:
```bash theme={null}
sudo apt update
sudo apt install -y git
```
## Next Steps
Set up authentication for your Gorbit deployment with OAuth, OIDC, or SAML.
Learn about all available configuration options for your Gorbit deployment.